Showing posts with label photography. Show all posts

Monday, March 30, 2009

Photography Composition Lesson #3

How are you doing? Is your head still swimming with rules? Have you been experimenting with your photos? This next lesson is a super simple and easy one, so don't worry. I'm giving you all a break! :)

If you haven't already, before you read this blog post you'll want to read Lesson #1 and Lesson #2.

Framing Your Subject

Framing your subject is a super easy way to draw quick attention to your focal point. There is NO doubt about what you're trying to show off in your photo if you frame your subject. Here are some pictures of mine to demonstrate what I mean:


A frame can go all the way around your subject, or it can just be on two or three sides of it. Unlike the other rules we've covered, this is just a technique you can use occasionally when it's convenient to really draw attention to what you want to highlight in your photo. Try it out this week and see if you can come up with a frame or two to try!

Monday, March 23, 2009

Photography Composition Lesson #2

It's Monday, so that means it's time for another photography lesson from me! If anyone out there has been experimenting with the rule of thirds, leave a comment with a link to your photo(s), I'd love to see them. If you haven't already read that first lesson, go here before continuing.

Directionality

This lesson is a relatively simple one. I'm calling it Directionality. This is not an official term I don't think, but it's my way of talking about photographing your subject while keeping in mind the direction the eye naturally moves across a picture.

Unless anyone out there is proficient in Hebrew, I'll assume my readers all read and write from left to right. Because we learn it this way, when we look at a piece of paper with words on it our eyes are trained to automatically start on the left of the page and move to the right. When viewing a picture there is a natural movement the eye wants to make as well. As a photographer it's your job of helping this natural movement along. There are two ways of doing this:

1. By helping the eye move from a focal point (something that is placed either along a line placed on a "third", or at the intersecting points in the picture) through the rest of the picture, or

2. By helping the eye enter a picture smoothly and right toward your focal point.

To demonstrate this first point, let's go back to this photo of my daughter Mary:


Because she is placed off center and according to the rule of thirds, I've photographed her in a way that your eye has room to move from her face over to what is in front of her, which gives you information about what she's doing at the time the picture was taken. This is the most common way directionality is taken into account while photographing subjects - by making sure to leave more room in the photo for whatever the subject is facing or looking at. The eye wants to move from the focal point of her face to what she's facing. This is especially helpful in scrapbooking, because you want your photos to help you tell the story or memory you're preserving.

Here's a good example of this: two versions of a picture I took the other day of my son in a tunnel at a playground:

Notice his head and body are off center, more or less at a line of third, and his entire body is in the shot. But does it feel awkward to you that you focus on his face and then your eye has nowhere really to go? Now take a look at the full version I captured on camera:


This picture is more visually appealing and tells a better story, I think. Your eye focuses on him and then has room to move in the direction he is moving. You get more of a feeling as to what is going on when the picture was taken, an important quality most scrapbookers would want to capture in their scrapbooking, I think.

Keep in mind something I said last time - sometimes rules can be broken, or at least tweaked a little! In this picture, my son is running but looking behind him. Which version do you like better? The one with more space in front of him, or behind him?


I think the second version provides the most visual interest. He's looking behind him, which causes the viewer to wonder, what is it he is running from? Another way to tweak the rule is to photograph more space behind the subject to show how far they've walked, for example. Really it all depends on the story you're trying to tell by taking the photo in the first place.

OK now we're moving on to the second point I mentioned earlier: How to help the eye enter a picture smoothly and right toward your focal point. The best way to do this is by using lines. Diagonal lines are the biggest attention getters as far as photos go. But any line in a photo will cause the eye to follow it, so you want the lines leading toward your subject if you can. The best way I can explain this is just by showing you, so here are a bunch of photos I've taken keeping the lines in mind:

In this first photo, notice the diagonal line of the sidewalk that draws the viewer in and up toward the subject of the photo. And in the following pictures, the slide and fence do the same thing.


In the below picture, the mower my son is playing with leads your eye up toward him in a way that taking the shot straight on might not have.
In this next shot, the cars as well as the rug lead your eye up the picture toward the focal point.


In the photo of my daughter below, I've moved over a bit so that the actual chair is creating a diagonal line up towards her, rather than photographing her straight on.


This next photo demonstrates both of my points well. The diagonal lines of the shore and water naturally lead the eye toward the subject, and there is more space in the direction he is looking, which would flow well with my accompanying journaling on a layout about how tentative he was about wading in the chilly lake.


One last tip: the way you angle your camera toward your subject can make your actual subject (or parts of him/her/it) a line. Here are a few photos to demonstrate what I mean. In these photos, I've positioned myself in such a way that my daugther is photographed somewhat diagonally. This causes your eye to move naturally right to her face.

And in this next photo, my son's outstretched arm while playing a game of peek-a-boo draws your attention straight to him.

And finally, I have homework for you! Take pictures while keeping the directionality of your subjects in mind. Experiment with lines and keep in mind what story you want to tell with the picture. This should help you position your subjects in a way that a viewer knows more of what you were trying to capture. Next week's lesson will be much shorter, thanks for hanging in there with me for so long this time! :)

Monday, March 16, 2009

Photography Composition Lesson #1

OK so admittedly I'm no expert at photography. But I did take a photography class, and my Dad is really knowledgeable in this area, and he's given me tons of tips. Also, a good friend of the family works as a professional photographer and I've absorbed a couple of things from him. Photos are obviously incredibly important to the art of scrapbooking, so I thought I'd share the few things that I know here on my blog.

What I know is all about composition. It's still trial and error for me to fiddle around with my camera's settings. You won't learn anything about aperture and shutter speed from me! So here's our first lesson in composition:

Rule of Thirds

Probably the most important thing you'll ever learn about composition is the rule of thirds. If you use a digital camera it is likely you even have a setting you can use to help you out with this. Look at your camera and see if it has a display button. Mine actually says "DISP". If you have this button, turn on your camera and point it at something, then press the button a few times. One of the displays you may see contains a bunch of intersecting lines. Your viewfinder will look like this:


Even if your camera doesn't have this setting, it's fairly easy to imagine the lines while you're shooting as well. These lines are to assist you in taking pictures according to the rule of thirds.

What is the rule of thirds? Well, the rule is based on the fact that when a person's eye looks at a photo, it more naturally tends toward the places those lines intersect rather than the middle of the photos. It will notice those four areas, as well as along the lines in the photo, first. So whatever is there will be the most noticeable to the person viewing the photo. What does this mean to the photographer? It means that it's important to position the objects you're trying to photograph in those places, rather than the direct middle of the frame. If you look again at the above photo you can see I've done just that. Mary is positioned along the left line, not directly in the middle of the photo. And her face is positioned right at an intersecting area.


Contrast that picture to this one:
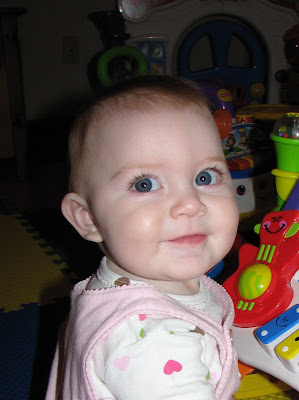


In that photo, Mary's head appears almost directly in the center of the photo. This is called the bullseye effect that a lot of people mistakenly do when they're photographing something. See all that empty space above her head? It's way too noticeable. As the photographer who captured this image, it's not my intention to draw people's attention to the area above Mary's head. And that top imaginary line runs right through the top of her forehead, and that's what will be most noticeable to someone viewing it.

This rule definitely applies to photographing horizons. In this first photo you can see how I positioned the sky to take up about 1/3 of the picture and the land and water at about 2/3. Also, the leftmost tip of land ends at right about an intersecting line.


Here's the same photo cropped in a different, less appealing way. The sky takes up 1/2 of the photo, and there is absolutely nothing of interest placed in any of the areas your eye is most likely to go. This photo does nothing to really display the shoreline, the land, or the water. A photo like this causes me to wonder what the photographer was really even trying to capture.


By the way, not following the rule of thirds when you take the picture doesn't mean you can't crop it that way later on. A lot of times I fiddle around with the picture later on to get the most important objects positioned where I want them. And with a fast moving toddler this is a necessity, because he's pretty much never in the shot how I'd like him!

The thing about rules is, some of them are meant to be broken! The rule of thirds definitely applies in MANY pictures but possibly not in EVERY picture. And you may already be doing this rule naturally, because what looks appealing to someone viewing a photo will probably look appealing to you. Experiment with your pictures using the rule and see what you think.

That concludes our first lesson! :)